程序访问控制管理 系列记录:
菜鸟论坛后端开发记录(一) 菜鸟论坛后端开发记录(二)
计划添加session和shiro的支持即用户登录鉴权以及会话管理(当然一天不太可能踩得完这些坑)。
“用户-角色-权限”管理
https://learner.blog.csdn.net/article/details/101121899
“用户-角色-权限”管理是 “访问控制” 的一种实现方式,更为专业的叫法为 RBAC(Role-Based Access Control),即基于角色的权限访问控制。不少地方提到RBAC 具有三个特性,或者说支持三个原则:最小权限原则,责任分离原则和数据抽象原则,这玩意儿就是骚话,没什么实际意义,有兴趣的自行百度(如果有面试的问这种问题,只能说明他是个瓜皮)。
我觉得关于 RBAC,最重要的是理解为什么要在用户和权限之间加上角色这一层,而不是直接把权限赋给用户。这个问题一点也不难,考虑需要修改用户权限的情形,给一两个用户设置权限没什么问题,但如果有成千上万个用户需要同时获取或去除同一个权限,那可费老劲了,但通过角色来完成这个工作就十分便捷。这实际上也是一种 “解耦” 的思路。
目前对于访问权限的控制几乎全部采用这种方式,差异在于能实现到什么程度。上篇文章提到过权限的三种粒度:菜单权限、操作/功能权限、数据权限。此外还有一些额外的功能,比如互斥性检验(一个角色不能同时拥有两种互斥的权限)、角色继承(新建角色时继承某一角色的权限)等。
本项目使用shiro框架来实现权限管理。Shiro教程
Shiro 是一个强大且易用的 Java 安全框架,可以用来实现身份验证(authentication)、授权(authorization)、加密(cryptography)和会话管理(session managment)
在pom.xml中添加依赖
1 2 3 4 5 6 7 <dependency > <groupId > org.apache.shiro</groupId > <artifactId > shiro-all</artifactId > <version > 1.5.3</version > <type > pom</type > </dependency >
用户角色与权限 我们要用三张表来分别储存用户、角色、权限,他们之间是一对多的关系,如一个用户可能有多个角色,而一个角色会有多个权限,分别创建三个实体类。
User、Role、Permission,
这里不贴具体代码了,但是遇到的问题记录一下,当我尝试在User中使用一个List来保存对应的多个Role时出现了Basic’ attribute type should not be a container 的提示,经过查询,需要我们手动指名对应关系即可。在该List上添加注解@OneToMany(targetEntity = Role.class)便不再报错了。
贴一下当前数据库中这三个实体都有什么属性(仅对于登录授权这个环节)
User:
字段名
类型
介绍
id
Long
用户在数据库中的id
account
String
账户
password
String
密码
email
String
邮箱
salt
String
加密时用的盐
roleSet
Set
用户所具有的角色
Role:
字段名
类型
介绍
id
Long
Role在表中id
roleName
String
角色名
permissionSet
Set
角色拥有的权限
Permission:
字段名
类型
介绍
id
Long
在表中id
permissionName
String
权限名
注意,使用这样的对象结构在使用JPA储存的时候出现了报错
object references an unsaved transient instance - save the transient instance before flushing” error
通过查询,发现当实体对象中有一个集合,且集合中包含有数据库中没有的实体,就会出现这个错误,我们需要添加注解@Cascade(value = org.hibernate.annotations.CascadeType.ALL) ,来告诉hibernate在保存对象时自动保存他们中的集合内的对象。
Shiro基本配置 首先创建Realm 类
Realm: 是 Shiro 和安全相关数据(比如用户信息)的桥梁,也就是说,Realm 负责从数据源中获取数据并加工后传给 SecurityManager。
我们可以通过配置使用特定的 Realm 替代 DAO,和 JPA 类似,Realm 获取数据的方法被封装了起来,但是数据库中的表名、字段等需要与源码预定义的查询保持一致,所以在我们的项目中获取数据的功能仍旧可以交给 JPA 完成,Realm 只负责加工并传递这些数据。
1
2
3
4
5
6
7
8
9
10
11
12
13
14
15
16
17
18
19
20
21
22
23
24
25
26
27
28
29
30
31
32
33
34
35
36
37
package com.aoyouer.noobserver.shiro;import com.aoyouer.noobserver.entitiy.User;import com.aoyouer.noobserver.service.UserService;import org.apache.shiro.authc.AuthenticationException;import org.apache.shiro.authc.AuthenticationInfo;import org.apache.shiro.authc.AuthenticationToken;import org.apache.shiro.authc.SimpleAuthenticationInfo;import org.apache.shiro.authz.AuthorizationInfo;import org.apache.shiro.authz.SimpleAuthorizationInfo;import org.apache.shiro.realm.AuthorizingRealm;import org.apache.shiro.subject.PrincipalCollection;import org.apache.shiro.util.ByteSource;import javax.annotation.Resource;public class NoobRealm extends AuthorizingRealm @Resource UserService userService; @Override protected AuthorizationInfo doGetAuthorizationInfo (PrincipalCollection principalCollection) return new SimpleAuthorizationInfo(); } @Override protected AuthenticationInfo doGetAuthenticationInfo (AuthenticationToken authenticationToken) throws AuthenticationException String userAccount = authenticationToken.getPrincipal().toString(); User user = userService.getUserByAccount(userAccount); String passwordInDB = user.getPassword(); String salt = user.getSalt(); return new SimpleAuthenticationInfo(userAccount,passwordInDB, ByteSource.Util.bytes(salt),getName()); } }
我们还需要一个Shiro配置类,(来自于网上)
1
2
3
4
5
6
7
8
9
10
11
12
13
14
15
16
17
18
19
20
21
22
23
24
25
26
27
28
29
30
31
32
33
34
35
36
37
38
39
40
41
42
43
44
45
46
47
48
49
50
51
52
package com.aoyouer.noobserver.shiro;import org.apache.shiro.authc.credential.HashedCredentialsMatcher;import org.apache.shiro.spring.LifecycleBeanPostProcessor;import org.apache.shiro.spring.security.interceptor.AuthorizationAttributeSourceAdvisor;import org.apache.shiro.spring.web.ShiroFilterFactoryBean;import org.apache.shiro.web.mgt.DefaultWebSecurityManager;import org.springframework.context.annotation.Bean;import org.springframework.context.annotation.Configuration;import org.apache.shiro.mgt.SecurityManager;@Configuration public class ShiroConfig @Bean public static LifecycleBeanPostProcessor getLifecycleBeanProcessor () return new LifecycleBeanPostProcessor(); } @Bean public ShiroFilterFactoryBean shiroFilter (SecurityManager securityManager) ShiroFilterFactoryBean shiroFilterFactoryBean = new ShiroFilterFactoryBean(); shiroFilterFactoryBean.setSecurityManager(securityManager); return shiroFilterFactoryBean; } @Bean public SecurityManager securityManager () DefaultWebSecurityManager securityManager = new DefaultWebSecurityManager(); securityManager.setRealm(getNoobRealm()); return securityManager; } @Bean public NoobRealm getNoobRealm () NoobRealm noobRealm = new NoobRealm(); noobRealm.setCredentialsMatcher(hashedCredentialsMatcher()); return noobRealm; } @Bean public HashedCredentialsMatcher hashedCredentialsMatcher () HashedCredentialsMatcher hashedCredentialsMatcher = new HashedCredentialsMatcher(); hashedCredentialsMatcher.setHashAlgorithmName("md5" ); hashedCredentialsMatcher.setHashIterations(2 ); return hashedCredentialsMatcher; } @Bean public AuthorizationAttributeSourceAdvisor authorizationAttributeSourceAdvisor (SecurityManager securityManager) AuthorizationAttributeSourceAdvisor authorizationAttributeSourceAdvisor = new AuthorizationAttributeSourceAdvisor(); authorizationAttributeSourceAdvisor.setSecurityManager(securityManager); return authorizationAttributeSourceAdvisor; } }
用户信息加密与用户认证 之后我们在controller中添加登录相关代码。
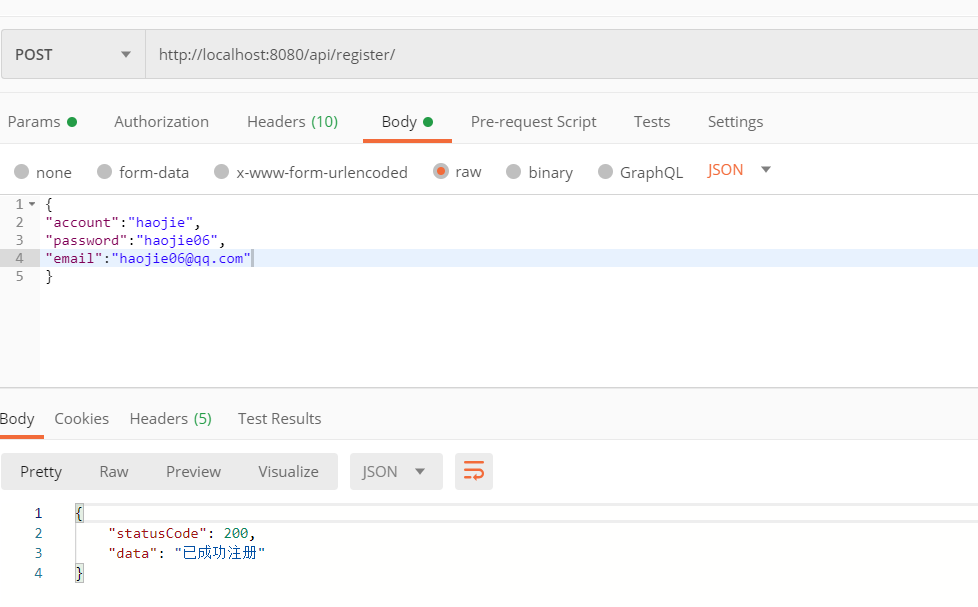
1
2
3
4
5
6
7
8
9
10
11
12
13
14
15
16
17
18
19
20
21
22
23
24
25
26
27
28
29
30
31
32
33
34
35
@RestController @RequestMapping (path = "/api" )public class UserController @Resource UserService userService; @PostMapping (value = "/login" ) public Response login (@RequestBody User user) String account = user.getAccount(); String password = user.getPassword(); Subject subject = SecurityUtils.getSubject(); UsernamePasswordToken usernamePasswordToken = new UsernamePasswordToken(account,password); try { subject.login(usernamePasswordToken); return new Response(200 ,"登陆成功:" + account); }catch (AuthenticationException e){ return new Response(200 ,"登陆失败" ); } } } @PostMapping (value = "/register" ) public Response register (@RequestBody User user) try { user.setPassword(Encrypt.encrypt(user.getPassword(),user.getAccount())); user.setSalt(user.getAccount()); userService.registerUser(user); return new Response(200 ,"已成功注册" ); }catch (RegisterException e){ return new Response(400 ,e); } }
需要注意的是,这里的密码需要和盐进行hash加密,使用的算法和加密次数都要和Shiro配置类中的设置对应。
1
2
3
4
5
6
public class Encrypt public static String encrypt (String pwd,String salt) return new SimpleHash("SHA-256" ,pwd,salt,2 ).toString(); } }
使用了Shiro框架之后,服务端也会记录客户端“登陆成功”的状态,那么我们还需要实现“注销登录”的方法,前后端分离项目中,前后端都要对注销登录做出处理,这里先写后端需要做的。
测试 用户注册 使用postman构造post请求,成功注册。
查看数据库,确实已经加上了。
用户登录
成功登录
使用错误的密码再试一次
符合预期。
用户授权与角色权限管理 用户、角色、权限之间的关系查看第一节(用户角色与权限 )。
用户登陆后在之后的请求中也需要有带有一些信息来证明自己是谁,关于认证有Session和Token等方案,可以查看https://learner.blog.csdn.net/article/details/102788866学习。
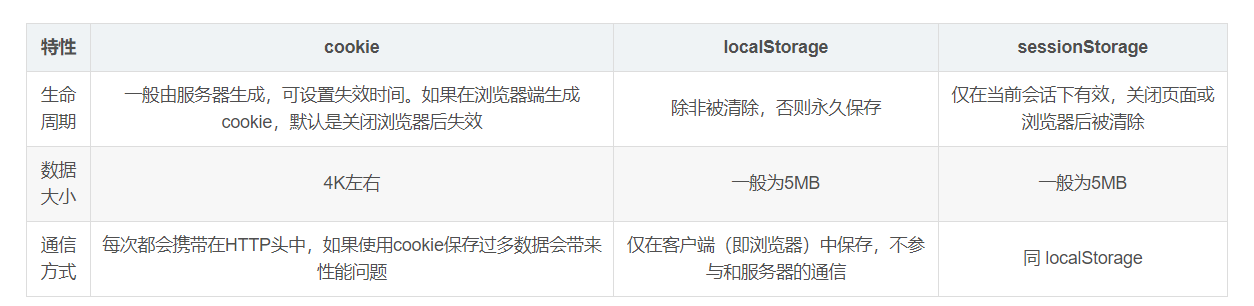
而在客户端拿到Session id或者Token之后也需要在储存,方案有cookie、localStorage 和 sessionStorage,参考https://www.cnblogs.com/minigrasshopper/p/8064367.html,对他们进行对比。
通常来说,在可以使用 cookie 的场景下,作为验证用途进行传输的用户名密码、sessionId、token 直接放在 cookie 里即可。而后端传来的其它信息则可以根据需要放在 local/session Storage 中,作为全局变量之类进行处理。
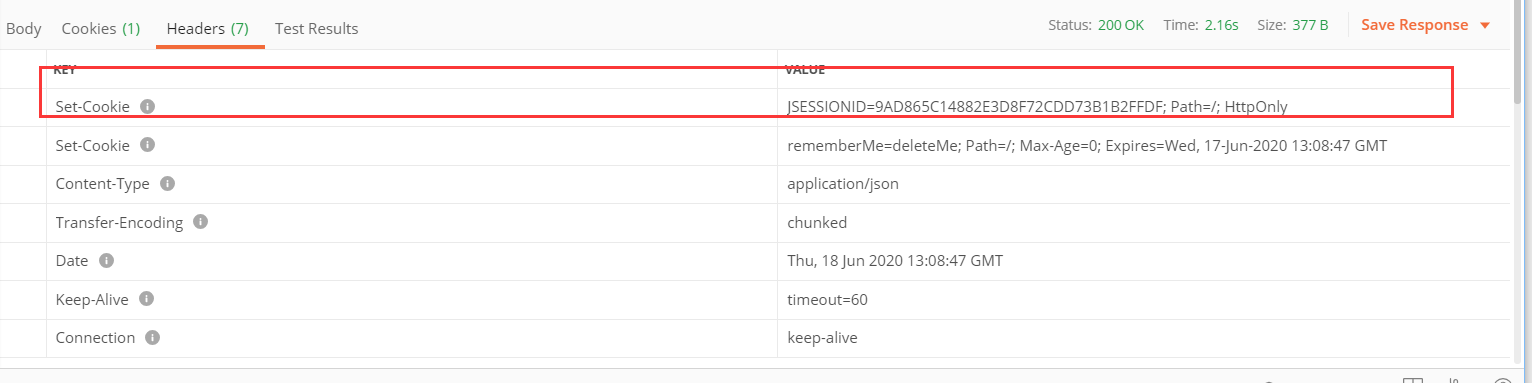
Shiro的安全管理基于Session,所以我们也使用Session来实现用户认证与授权。 上一节使用到的subject.login()方法就生成了一个session并把sessionid设置到了cookie中,之后我们的请求中只要带上这个cookie就知道当前的用户(Subject具有什么权限,属于哪个角色了)。
为了实现角色与权限的管理,我们需要完善Shiro核心类,之前在用户注册的时候我们创建了AuthorizingRealm的子类NoobRealm,并重写完善了它的doGetAuthenticationInfo方法,该方法用于认证 (即用户的登录过程),而还有另一个需要重写的方法doGetAuthorizationInfo ,该方法用于授权,即判断用户是否有权限执行操作,在该方法中我们需要自行获取用户的角色与权限并放到返回的AuthorizationInfo授权信息中。
Shiro中的Authentication 是用来验证用户身份,Authorization 是授权访问控制,用于对用户进行的操作授权,证明该用户是否允许进行当前操作,如访问某个链接,某个资源文件等。
用户进行权限验证时候Shiro会去缓存中找,如果查不到数据,会执行这个方法去查权限,并放入缓存中,至于如何查找,需要我们自己实现。
参考: https://zhuanlan.zhihu.com/p/98365213
1
2
3
4
5
6
7
8
9
10
11
12
13
14
15
16
17
18
19
20
21
22
23
24
25
@Override protected AuthorizationInfo doGetAuthorizationInfo (PrincipalCollection principalCollection) System.out.println(principalCollection); SimpleAuthorizationInfo simpleAuthorizationInfo = new SimpleAuthorizationInfo(); logger.info("principalCollection.getPrimaryPrincipal()" + principalCollection.toString()); User user = userService.getUserByAccount(principalCollection.getPrimaryPrincipal().toString()); logger.info("授权中:" + user.getAccount()); Set<String> roleNameSet = new HashSet<>(); Set<String> permissionNameSet = new HashSet<>(); User dbUser = userService.getUserByAccount(user.getAccount()); Set<Role> roleSet = dbUser.getRoleSet(); for (Role role:roleSet){ roleNameSet.add(role.getRoleName()); for (Permission permission : role.getPermissionSet()){ permissionNameSet.add(permission.getPermissionName()); } } simpleAuthorizationInfo.setStringPermissions(permissionNameSet); simpleAuthorizationInfo.setRoles(roleNameSet); return simpleAuthorizationInfo; }
之后为了便于限制权限,我们可以开启Shiro注解 的方式来管理,但是需要我们在Shiroconfig里面增加两个方法。
1 2 3 4 5 6 7 8 9 10 11 12 13 14 15 16 17 18 @Bean @DependsOn ({"lifecycleBeanPostProcessor" })public DefaultAdvisorAutoProxyCreator advisorAutoProxyCreator () DefaultAdvisorAutoProxyCreator advisorAutoProxyCreator = new DefaultAdvisorAutoProxyCreator(); advisorAutoProxyCreator.setProxyTargetClass(true ); return advisorAutoProxyCreator; } @Bean public AuthorizationAttributeSourceAdvisor authorizationAttributeSourceAdvisor () AuthorizationAttributeSourceAdvisor authorizationAttributeSourceAdvisor = new AuthorizationAttributeSourceAdvisor(); authorizationAttributeSourceAdvisor.setSecurityManager(securityManager()); return authorizationAttributeSourceAdvisor; }
之后我们便可以使用下面的五个权限注解了
RequiresPermissions
当前Subject需要拥有某些特定的权限时,才能执行被该注解标注的方法。如果当前Subject不具有这样的权限,则方法不会被执行。
这是基于资源权限方式的权限控制主要方案,也是我们项目中进行权限控制使用的注解方案。
RequiresRoles
当前Subject必须拥有所有指定的角色时,才能访问被该注解标注的方法。如果当天Subject不同时拥有所有指定角色,则方法不会执行还会抛出AuthorizationException异常。
RequiresUser
当前Subject必须是应用的用户,才能访问或调用被该注解标注的类,实例,方法。
RequiresAuthentication
使用该注解标注的类,实例,方法在访问或调用时,当前Subject必须在当前session中已经过认证。
RequiresGuest
使用该注解标注的类,实例,方法在访问或调用时,当前Subject可以是“gust”身份,不需要经过认证或者在原先的session中存在记录。
之后我们可以在需要检查权限/角色的方法上添加类似于@RequiresRoles(value = {"ADMIN","MANAGER","MEMBER"},logical = Logical.OR)这样的注解即可。
另外,权限不足的时候会抛出AuthorizationException异常,要处理该异常也可以使用在异常处理方法上添加注解的方式来注明。
1 2 3 4 5 @ExceptionHandler (AuthorizationException.class ) public Response authorExceptionHandler (AuthorizationException e ) return new Response(403 ,"授权验证失败" + e.getMessage()); }
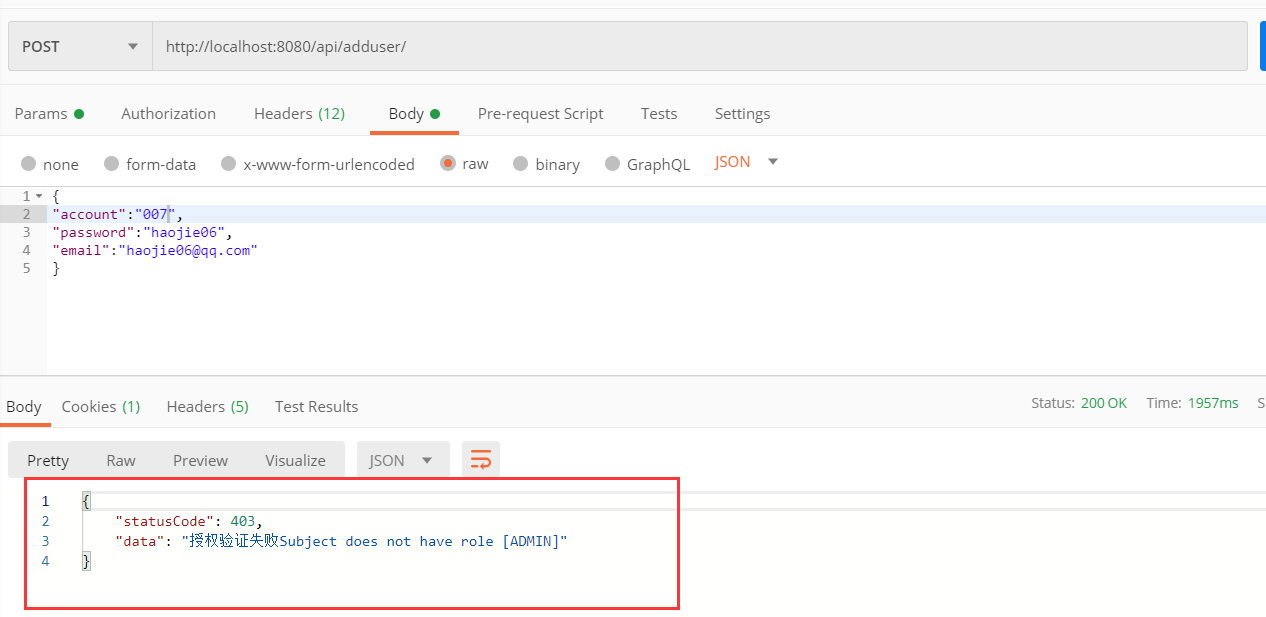
测试 默认注册时的用户角色都是MEMBER(目前我还没有细分权限管理,所以只看角色),而我添加了一个adduser的方法,要求的角色是@RequiresRoles(value = {"ADMIN","MANAGER"},logical = Logical.OR),我们可以查看是否能够执行。
我们先登录
注意登陆成功后会返回cookie
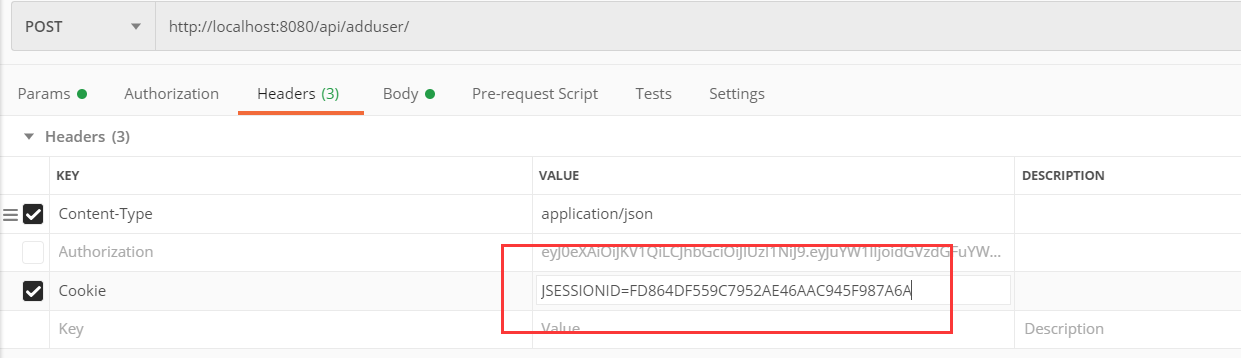
之后我们尝试使用/api/adduser来添加一个用户,注意要在Headers中带上cookie
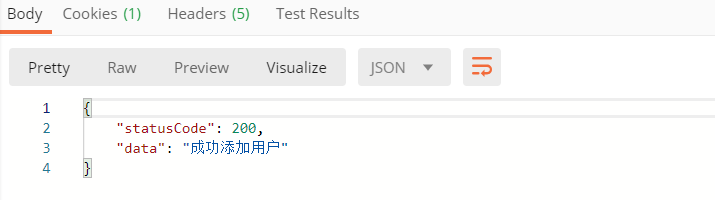
发现该请求确实被拦截了,并且异常处理函数也正常调用了。我们再尝试修改代码,向该方法的注解中添加MEMBER,再次运行。
这时候我还没登录,直接运行,也是错误的,提示不允许使用匿名的Subject,先登录再再次请求,成功添加了用户。
本节参考 https://learner.blog.csdn.net/article/details/102788866
https://blog.csdn.net/weixin_45492007/article/details/102076816
https://cloud.tencent.com/developer/article/1448332 (开启权限注解)
参考资源
访问控制及其实现思路 使用 Shiro 实现用户信息加密与登录认证 Shiro教程 Apache Shiro中使用注解来实现角色控制和权限控制 Shiro核心类编写 Shiro认证与授权 springboot + shiro 实现登录认证和权限控制 SpringBoot 整合 Shiro 实现动态权限加载更新+ Session 共享 + 单点登录